Showing posts with label How To. Show all posts


Google I/O 2017 was a blissful one, as a lot of android users where filled with frenetic excitement. Google's annual developer's conference brought all the major engineers and developers together and the company made the biggest announcements you might have missed. One of the important keynotes was the launch of Google Assistant on iPad and iPhones. Yes!.. You heard me perfectly well, Google Assistant have arrived on the iOS to compete with Apple's Siri. Now this might sound meaningless, but the voice-enabled Google assistant won't replace the iPhone Siri. If you haven't heard of Google assistant before, then i guess you are living under a rock. Google assistant is an AI just like Microsoft Cortana and Apple Siri. Its your personal assistant that can efficiently carry out various task on your device. All you need do is, ask it questions, tell it to do anything it'll carry out the task amicably. Now if you're anxious to see how the Google assistant looks on iOS, here's how to install it in any country.

Also Read: How To Enable Picture in Picture Mode On Your iPhone.

Change Region

Google assistant is available on the Apple Store, but it's only restricted to citizens in the United States. This is quite frustrating, as Nigerians and other countries can't get it. But there is always an easy workaround. So to get this one going headover to General via iPhones Settings menu. Select Language & Region, then set your devices language to English (U.S).  Now open Google Assistant on your iPhone via the App Store, this will prompt you to change the App Store to U.S region. Simply tap on "Change Store", then scroll all the way down from the featured tab and select Apple ID. A pop-up menu will appear, hit Sign Out.


Create New Apple ID

Now tap on "Sign In" again, this time select Create New Apple ID and on the next page, choose United States as your country then tap "Next". From here, you will need to provide necessary informations such as your email and password for your Apple ID creation then tap next. On the next page select "None" as your payment method, fill out other details and input any random address and pin code from the United States. Once done, tap next and a verification email will be sent to you via your Gmail account. Simply verify the mail to complete your Apple ID creation.


Install Google Assistant

Now search for Google Assistant on the App Store, once found tap on the result then hit "Get" followed by "Install".  The App Store will prompt you to enter the password for email, simply provide this information and Google Assistant will start downloading on your iPhone or iPad. That's all, you can now setup and use Google Assistant on different regions such as Nigeria, India , Australia etc.


First Look at Google Assistant on iPhone

The Google Assistant seems to work well over here in Nigeria, simply open the app on your iPhone and tap continue. From the next page, tap "Yes I'm In" to give Google Assistant permission to help you in working accurately.
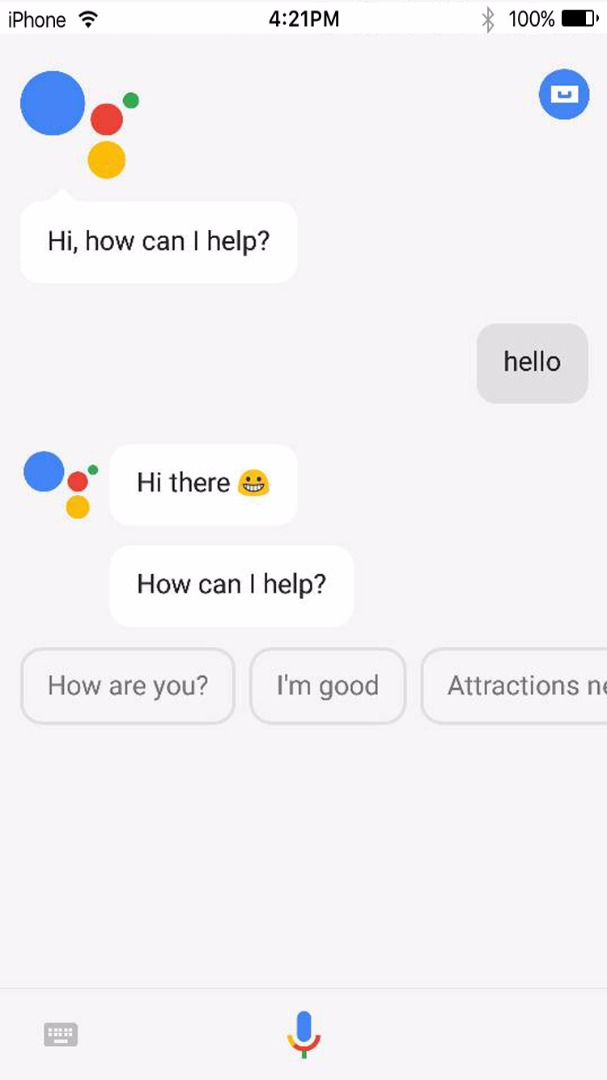

Hit Next on other options, when you're finished setting things up, click on the microphone icon then hit OK in other to use your voice to interact with your assistant. Ask the AI questions, tell it to do anything and see how fast it processes all your queries.


Get the entire Galaxy S8 features such as the icon packs, launcher, navigation bar, wallpapers, ringing tone, weather and clock widgets.


The Google Pixel reign was a long one, and now the Samsung Galaxy S8 has emerged to take over power. Before now, we've seen a lot of concept images and expected features of the Galaxy S8, this are no longer rumors because the Galaxy S8 has surfaced with a new look and redesigned UI. The Galaxy S8 and S8+ marks the new phase of Samsung's upcoming smartphones, with the S8 unique design and top notch features, you'd agree with me that something more classic and flamboyant will resurface sooner or later. Samsung Galaxy S8 and S8 plus brought some exclusive features that aren't available on the S7 device.
Also Read: How To Get Galaxy S8 Bixby Assistant On Your Samsung Device.
Firstly, the Galaxy S8 unveiled a rounded display corners, coupled with an on-screen navigation keys. In this way, Samsung got rid off the physical hardware buttons and the S8 also broke free from the confines of bezels. Now if you have recently upgraded to a newer Android device, or you couldn't afford $700 to purchase the Galaxy S8, then you might be wondering how to brings all the exclusive Galaxy S8 features to your Android phone. Think no more, for in this article we are going to unveil the best way to experience the Galaxy S8 features on your current device.

1. S8 Launcher

S8 launcher

Samsung Galaxy S8 hit the shelves with an elegant and smooth launcher that'll gladly replace the TouchWiz Home. Visually, the new S8 launcher does not seem completely different from the S7 edge launcher, but it offers a smoother experience and brings handy features. The S8 launcher unveils a swipe-up gesture that opens the app drawer and there's a quick search for various apps. Now installing the S8 launcher will require you to clear the old TouchWiz Home data and uninstall previous updates in other to avoid force close or unable to install error. To do this, head over to Settings -> Apps -> TouchWiz Home, then select Storage and Clear Data followed by uninstall updates. Next download the S8 Launcher and install it on your device, now hit the home button and select TouchWiz Home as your default home launcher. The S8 launcher works only on the Galaxy S7 and S7 edge running on 7.0 Nougat.

2. S8 Icon Pack

S8 icon pack

Getting the ultimate Galaxy S8 features will certainly not be complete without the icon pack. The Galaxy S8 and S8+ unveils a new redesigned icon pack that looks smoother and classic. The rounded icons reminds me of the pixel icon pack, but getting a little bit closer, you do agree with me that the icons mimics that off symbian belle. The Galaxy icon pack looks pretty cool, and there is a way to taste it on your current Android device. Having vetted the Google Play Store we found the perfect replica of the Galaxy S8 icon pack. However since the default S8 launcher doesn't allow you to customize or change the icons on device, you'll need to install Nova Launcher as it allows you to change the default icon themes. To get this one over with, head over to the Google Play Store and install UX Experience S8 - Icon Pack. Then go to Nova launcher Settings -> Look & feel -> Icon themes and select the S8 icon pack.

3. S8 Wallpapers and Ringing Tone


Just like the Google Pixels, Galaxy S8 and S8+ brings a huge collection of beautiful stock wallpapers that you'll love. Most of these wallpapers are in QHD, and they'll suite your Android device perfectly. If you have been eager to experience the entire Galaxy S8 stock wallpapers on your phone, then it's about time you start downloading them. The exclusive Galaxy S8 wallpapers are in 2960 x 2960 high resolution, you will get to experience stunning gradients, night sky, geometric and abstract HD wallpapers. Download the Galaxy S8 stock wallpapers and ringing tones now.

4. S8 Navigation Bar


Galaxy S8 and S8+ where the first Samsung device to use softkeys, now if you are a fan of Galaxy S8's on-screen nav bar, here is how to get it on your Android phone. First your device must be rooted, then download and open xposed Installer, now head over to the "download section" and search for "Galaxy S8 Navigation Bar". Tap on the result, then swipe from the left to navigate into the version tab and install the module. Alternatively, you can download Galaxy S8 Navigation Bar from the Google Play Store. Now to activate the module, simply open the xposed installer app and head over to the module section. Then tick Galaxy S8 Navigation Bar option. Now head over to the "framework" section and perform a soft reboot. Once your device is back on, you will see the S8 Navigation Bar working perfectly.

5. S8 Weather & Clock Widget With Search Bar

get S8 weather and clock widget with search bar

Galaxy S8 unveils a pretty minimal weather and clock widget coupled with an eloquent search bar. Now if you've ever wanted to taste the S8 search bar and widgets, then it's quite possible. We have recently found some cool Zooper widgets that replicate the S8 clock, search bar and weather widget. These widgets where created by the XDA developers "thanhtuan1611 and ramoneluis" and it can be implemented without rooting. To get this one going, download S8 Weather widget and Search bar (Zooper widget pro included). Then download the clock widget. Open Zooper Widget Pro to initialize the folder in your memory. Now extract the contents on Y.S8_Weather.rar and Templates_1_.zip.


Then copy the .zw files to ZooperWidget/Templates. From here, long press on the home screen and select "Widgets". Now scroll down to the bottom of the widget list and select Zooper widget. (We recommend 2×3 for the clock / weather widget and 5×1 for the search bar). Now tap on the empty zooper widget you just created from the home screen, then select SD Card and choose the widget you prefer. The search bar works just like the Google search, simply tap on it to open the Google app, then hit the micro icon to use the Voice Search. That's all with the Galaxy S8 exclusive features.


Alot of people loves to travel for pleasure, and during this period of tourism you are mostly been accompanied with your digital camera in other to take a perfect or clear shot at a fantastic view, circus or scenery. If you are into tourism, taking a picture of a landmark can be quite difficult, imagine a situation where you've positioned your camera to take a clear picture of a natural view, and just when you're about to release the shutter, someone walks straight in front of your camera. Dude!.. you have just been photobombed. An animal or someone have deliberately ruined your picture. Now you may not notice the photobombing on time, not until you get home and James will ask "hey! Is that a girl on the background?".
Also Read: How To Remove Watermark From a Photo.
Removing unwanted peoples, animals and objects from a photograph requires lots of skills, however there are a ton of softwares and online tools that can adequately get rid of photobombs from your pictures. Most of this tools doesn't require any photo-editing skills, as they're easy to use and can get rid of unwanted people and object from a photo with an incredible ease. If you are ready to remove those goofy strangers, animals and objects from your photograph, here is how to get started...

A spectacular background or scenery that has been photobombed!. Let's remove those goofy strangers and animal.

Install Inpaint

To begin with, you'll need to download and install the software inpaint on your Windows or Mac OS. Inpaint is an incredible tool that can remove unwanted people from a photo in literally less than one minutes, but since good things doesn't come easy, you'll need to pay only $19.99 in other to activate the program with the license key that'll be sent to you via email. However you can still use the free trial of the inpaint software to see how easy it is.

Load the Image with Unwanted People

Once you've downloaded and installed the inpaint software, the next step, is to load the image with the unwanted people and objects. So to get this one going, click on the upload icon at inpaint top menu, then browse through your gallery and select the specific image that was ruined with goofy strangers.


Select the People and Objects to Remove

Now it's time to get rid of the photobombs. Inpaint offers handy tools that can help to remove objects from a photograph easily. From the inpaint top menu, we have Open, Save As, View Original, Undo, Redo, Zoom In, Zoom Out, Normal View, Zoom to fit, Erase, Clear Selection etc. Now to remove unwanted people from the image you just uploaded, simply drag the marker or brush to select the people or objects you want to remove.

Remove them!

Remember you can easily zoom in to make a fine selection, and the marker size can be adjusted too. Now once you've selected all the photobombs, simply click on the erase (play) button and the photobombs will be removed magically. Now save your photo and enjoy the original spectacular scenery. In summary, inpaint is a great software as it removes photobombs with ease. There is no need to fiddle around, inpaint can make a finer precision.


Other Alternatives

Inpaint is incredibly simple, however not everyone can afford $19.99 to buy the full software with license key. But you can use Movavi Photo Editor.software, which can easily remove unwanted people, animals and objects on your photograph for Free. The software is available for Windows and Mac OS, and you can head over to movavi official site to read the instructions on how to use movavi photo editor to remove photobombers from images. Also if you find it awkward installing softwares on your PC, you can use this online tool webinpaint to get rid of photobombers, but this does not come Free either.

Photobombers removed!


Earlier today, i was instigated to figure out the perfect way to turn ON or OFF Android screen using the Double tap feature. If you are a regular custom ROM user, chances are your power button would have gotten weak due to constant reboot into recovery and you will certainly want to limit your device's power button usage. One of my buddy narrated how his device fell on the ground accidentally and the power key got broken. Now whenever he trys to use it, it usually gets stuck, and causes his phone to switch ON and OFF. The double tap feature can also come in handy whenever you find it difficult to press the power button on your phone or you simply want to preserve your physical power button.

Basically, there are two simple ways to get the double tap feature on your device, the first option is to flash a custom kernel that supports the double tap feature, while the second option is to use a third party app on the Google Play Store. Now you'll certainly concur with me that the second option is universal, as finding a custom kernel with the double tap feature could prove to be a tedious task and moreover it will demand for root permission. The Google Play Store offers a ton of Android apps that can bring the double tap feature on your Android device, but most of them brings limitations which won't be an hindrance either. Thus we're unveiling the best Android apps that can enable you to double tap and wake up / turn OFF Android screen.

#1. Smart Screen On/Off Auto

Smart Screen on/off is a simple application designed to automatically turn On or Off your Android screen by using a proximity sensor and double tap on the home screen. This will limit your device's power button usage and thus preserve it to last longer. So to begin with, head over to the Google Play Store and install Smart Screen On/Off Auto . When you open 'smart screen' for the first time, you will be greeted with a simple and easy-to-use interface, so you'll only need to tinker with the app settings.


There isn't much to set up here, under the "Auto screen settings", you can choose to enable the screen ON or Off automatically. You can also create a shortcut on the home screen to quickly turn off your screen. Tap on the "Create Shortcut" option, then input shortcut name and hit OK. Now under the double tap settings, toggle ON "double tap to turn off screen". Under the optimization settings, you can choose to enable the first option i.e if your device has a phone cover. This will auto turn on/off your phone when you open or close the cover.


As stated earlier on, Smart Screen can turn ON/OFF your phone by using the proximity sensor. Simply toggle ON this option under the "optimization settings" and then swipe your device through the 'proximity sensor' to wake up or off the screen. Next from the "advanced settings" option, you can choose to enable "show floating popup" which will turn off your phone more faster. Tinkering with smart screen isn't difficult, you'll only need brains. The app works pretty fine but with limitations.


Bonus Tips

Smart screen has its own limitations, as the app allows you to only turn off your device with a double tap from the home screen. It will be more perfect if the 'developer' adds the double tap to turn ON screen. However you can use other cool alternatives for this. Apps such as KnockON - tap to wake or lock and double tap to screen ON and OFF can do the jobs too. They are capable of turning on/off your device with a double tap. But don't expect a perfect or impeccable performance.


If you are an iPad or iPhone user, then you will need to know that there is a unique feature integrated on your iDevice. This feature is known as Assistive Touch and it comes in handy for protecting your device's physical home button and volume key. The iPhone's assistive touch feature 'unravels'a small 'bubble' located at the edge of your screen, and once you tap on it, you'll be presented with a 'virtual floating panel'which gives you quick access to all your favorite apps, games, settings and quick toggle. The iPad or iPhone assistive touch feature helps you to easily interact with your device's screen. This is useful for smartphones with bigger screen.
Also Read: How To Enable Picture in Picture Mode On Your iPhone.
If perhaps you're not aware of the assistive touch feature on your iPhone or iPad, then you can easily enable it from your device's Settings menu. Simply navigate to General Settings --> Accessibility, then scroll down to 'Interaction Settings' and from here, tap the "Assistive Touch" option and toggle the button to enable it. You can also go further to customize it to your preference by using the customize top level menu.  Now diving back to the main article, we've figured out a way to bring iOS assistive touch feature on Android and this does not require root permissions. So if you've got your Android phone ready, here's the apps that can bring iOS assistive touch on Android.

1. Assistive Touch For Android

Assistive Touch is an easy tool for Android device that allows you to get the exclusive iOS like assistive touch feature. The app is quite smooth, fast and easy to use. Now to begin with, simply head over to the Google Play Store and install Assistive Touch For Android. Once you open the app, you will notice a 'small bubble on the edge of your device's screen, this will be used to call-out the floating panel. By default, once you tap on the 'small box', you'll be presented with a virtual floating panel with five shortcuts. There, we have the "RAM booster" which cleans and free up space on your device's RAM, thereby speeding up your phone and saving battery.


The "Home Button Shortcut" located at the floating panel of assistive touch, catapults you directly to your device's home screen once you tap on it. You can also Lock your phone from the floating panel but this will require you to activate the device manager via the Settings menu. Now clicking on the Settings shortcut in assistive touch floating panel won't take you to your device setting rather it'll bring out a list of shortcuts you can toggle ON. Assistive Touch for Android also brings an option to add quick actions, when you click on the 'Favor' icon, a list of 'empty boxes' will appear, allowing you to add your favourite apps and games.


When you open "Assistive Touch" on your Android device, you'll be able to customize the 'floating panel' to your preference. The app's first option allows you to enable or to disable the assistive touch. Now under the floating menu, we have the layout and this shows panel settings from where you can add shortcuts. Assistive Touch allows you to change the "floating panel" background color and you can change the small bubble icon too. We also have the display option & the gestures which determines how to call-out the floating panel. Assistive Touch is a must have app, as it mimic's iOS assistive Touch feature.

2. EasyTouch

Easy touch is another assistive touch tool for Android that brings a ton of 'advanced' features to its abode. The app allows you to experience the iOS-like assistive touch in a more faster way. To get this one going, you will need to dive into the Google Play Store and install EasyTouch. Once after this, tap to open EasyTouch from your device's app drawer and skip the introduction. Now a small bubble will pop-out from the edge of your screen, so you'll need to tap on it and this will call-out the floating panel. Similar to Assistive Touch for Android, EasyTouch brings a booster icon that serves as a clean master which helps to make your Android phone faster by cleaing up junk files.


At top, we can see the Google search which comes pretty much in handy for variety of purpose. EasyTouch also unveils a "Back" button which will only start working once you enable the app's accesibility service via your device Settings menu. Unlike the assistive touch, EasyTouch brings advance features as stated earlier on, you'll be able to see the recent tasks on your phone and also turn ON the flashlight within the app's floating panel. The Main Screen icon does it job according to its name, also similar to assistive touch, EasyTouch shows a lists of shortcuts to toggle ON when you tap on the Settings icon.


EasyTouch brings customizations abilities, to edit an icon, simply tap and hold on any empty space. Swiping from the left or right of the "EasyTouch floating panel" gives you quick access to your favourite apps, games and contacts. When you open EasyTouch, you will be greeted with an easy to use and intuitive user interface. There are a ton of options you can tinker with, and when you dig in deep, you'll discover that EasyTouch brings plethora features. In summary, the app is quite cool and handy, as it lets you to experience the iOS-like assistive touch feature on Android.


stream PC games on android

When it comes to playing PC games from your Android device, we'd know that this practice isn't new as the "NVIDIA GameStream technology" lets us stream games from a GeForce GTX-powered PC to our Android device or TV. This concept however supports only the NVIDIA’s Android-based SHIELD device. But if you want to access and play your favorite PC games on your android device, then you can use a 'third-party' service known as "Remotr" to achieve this. Remotr brings the opportunity to enjoy PC games from our mobile with the same performance & visual quality.
Also Read: How To Turn Your Smartphone Into A Set Of Wireless Keyboard And Mouse For Your PC.
In a nutshell, Remotr works by mirroring your "PC screen" directly to your android device. In this way, the app will provide a "smooth streaming experience" for even the most graphics intensive games. Also Remotr includes a "custom presets"  and this will give you the full control to modify and customize their own controls for each game. Now without further ado, let's quickly get started and perhaps see how remotr works by setting it up

Install Remotr on your PC and Register an Account

To begin with, you will need to download and install Remotr Streamer on your PC or computer system.  Note: the software is supported on Windows 7, 8.1, 10. Next you'll have to create a new account, this will require your email and password. So once you're done, simply login to remotr streamer.

Install Remotr on Android and Log in to the Streamer

Now navigate to the Google Play Store & search for Remotr Game Streaming. From here, simply "install" the app on your phone. Then locate & open the app from your device app drawer & Log in to the client app with the same email and password you created earlier. (Remotr is also available on iPad, iPhone, Android and Windows Phone). So you can download the app from your consecutive platform application store.

Remotr

Stream PC Games On Your Android

Once you've logged in with your remotr account, you'll then be able to access all the games on your PC. But first, you will have to select your PC from the list, then select the game you want to play. If your PC game wasn’t automatically detected by Remotr, then you'll need to add them manually. To do this, simply double click on the "Remotr Streamer" icon on your computer’s system tray. This will open the Remotr Streamer,  from here, click on ‘Show games list’ followed by ‘Add game manually’. Then browse through the location and select your games. Once you're through, you will now be able to control the gameplay from your mobile phone.

You can even play GTA V on your android by using Remotr
Remotr also supports up to four 4 players and if you'd like to race with your friends then this feature will come in handy. All you need to do, is to install 'Remotr' on your PC and Android device, then Log in or create an account (I.e if it's your first time). Next install Remotr Streamer app on your mobile, then connect your phone to your PC and choose the game you want to stream. From here, urge your friends to connect to the same 'streamer' as you did by using your password & email. That is it. You can now access and play all your favourite PC games from your Android device.

Wrapping Up

Remotr seems to be of importance after all, the app works flawlessly and you can access and play your PC games no matter where you are. Remotr Game Streaming also supports a Gamepad Controller, and this makes it convenient to enjoy all your PC games remotely from your mobile. All this will only require a strong internet connection.


Samsung's 'Bixby Assistant' is actually a new 'artificial intelligence' that's meant to be featured into the upcoming Galaxy S8 and S8 plus. We've already unraveled this 'news' on one of our previous posts, so it is one of the exclusive features that will be integrated on Samsung's flagship device. Bixby, similar to Cortana, Google Assistant and Apple Siri, can make your phone helpful, the new AI can assist you in completing tasks, telling you what you are looking at, learning your routine and also remembering what you need to do. Bixby is definitely a new way to interact with your Samsung Galaxy device.

With just your voice, or a screen context search. Bixby can accurately perform all your daily routines, search informations and interact with all of 'Bixby's enabled' applications. The smart powered AI, can become your personal assistant, helping you to access your favourite apps and it'll remind you when and where you need to be reminded. While the Samsung's Bixby assistant seems to be fascinating, genius and essential. It is however, intended to be featured only on the Galaxy S8 and S8 plus. But not to be saddened, developers have figured out a way to get Galaxy S8's Bixby Assistant on older Samsung device running on Android 7.0 Nougat. So if you are ready to unleash Bixby on any of your Samsung device running on Nougat, here is how to get started...

Install S8 Launcher

To begin with, you will need to install the new Samsung Galaxy "S8 Launcher" on your device. This is required if you would want to adequately run Bixby on your old Samsung mobile. The launcher is totally Free, so you can install it from here.

Switch to the S8 Launcher

Next, switching to the new downloaded S8 Launcher will be necessary. So to get this one going, navigate to Settings and dive into Applications. From here, tap on the three dot menu and then click on the 'Default Applications' options. From the next window, tap on the "Home Screen" option and select TouchWiz Home from the list. Then tap the "Home button" to switch to the new S8 Launcher.

Install Bixby (.apk)

Install 'Bixby assistant' on any Samsung Galaxy device is perhaps too simple. The procedure will require you to ready your brain and mobile. Also make sure you've enabled Unknown Source via your device Settings. Next, download Bixby.apk and install it on your Samsung device.

Enable Hello Bixby Cards

Once you've installed Bixby, navigate to your device 'Home Screen', then tap and hold the Home Button. From here, select "Home Screen Settings". This'll take you to the S8 Launcher Settings. Now tap on "Hello Bixby Settings",  Followed by the "Hello Bixby Cards" and enable the apps inside. Reboot your phone afterwards.

Getting Started with Bixby Assistant

When your device reboots, tap and hold (long press) on the Home Button, you'll see a toggle icon on the top right of Hello Bixby. Simply enable or turn it ON. Then swipe left to get Bixby cards. Once you're through, Bixby Assistant will be running on your Samsung device. Getting started with Bixby is quite simple, just push the Bixby button and start asking questions. Bixby knows your phone’s apps and how to use them. You can talk or type, because Bixby understands it all. Bixby also brings an intuitive UI, it lives inside your phone's Camera, Gallery and Internet to give you a deeper understanding of what you are looking at. Bixby can learn your routines, so you’ll always have the right content ready.

Wrapping Up

You can now say Hello to Bixby, it is the new AI from Samsung designed to make your phone easy. Note: only the "Bixby Cards" are available in this version, thus you won't get the exclusive features that Samsung "showed off" during  the Bixby introduction. Features such as screen context based results, image based search and voice features aren't available for now, however we're anticipating this on the app's new update. Till then enjoy Bixby on your Samsung device running on Nougat. Endeavor to tell us your experience with Bixby.


Our smartphone functionality has began to improve quite rapidly. Courtesy to the various handy apps and tools that allows us to take things to the next level. Before now, there was not much to do with our smartphones. Except for playing games, music and answering calls. However, the case is now different, as we can now do a lot of things using our smartphone. Most of the tasks that were once only done on a computer can now be achieved with our smartphones. Fascinating huh! This does not mean you shouldn't have a computer and a phone at the same time, as having both can still come of neccesity, enabling you to carry out critical tasks all together without any hassles.

If you've ever wanted to turn your iPad, iPhone and Android into a wireless user-friendly remote mouse and keyboard for your computer, then it is possible with a remote mouse app. Imagine when you're lying on a bed at night watching multiple movies non-stop. There's no need to get up and start typing on your keyboard, or to pause/play the movie. You can simply take control of this task by lying on your bed.  Remote mouse unveils a simulated touchpad, keyboard and featured remote panels, to make your remote experience simple and efficient. The app can be of essence, if your mouse or keyboard is broken. Here's how to use it!!.

Install Remote Mouse Server on Your Computer

To begin with, you will need to install the latest version of Remote Mouse Server on your computer. Simply navigation to the Remote Mouse website or click here. to head over to their download page. Now install the software on your Windows or Mac. As of now, you can download and install Remote Mouse Server on your Windows 8, 7, Vista, XP, and Mac OSX 10.5+.


Install Remote Mouse on Your Mobile

Next you'll need to install the latest version of Remote Mouse app on your smartphones. So to get this one going, head over to your respective phone's store, then search for the app & simply install it. Alternatively, you can install Remote Mouse for either Android, iOS, or Windows Phone by clicking here.


Connect Your Mobile Device to Your Computer

Next you'll need to connect your mobile device and computer together. So make sure that your mobile device and PC are connected to the same Wi-Fi network, & then open Remote Mouse on your mobile device. From here, click "Start" button. The app will begin to search for a nearby server(s) and connect to your computer automatically. If more than one server is found, a list of servers will be prompted for selection.


Optionally, you can connect your mobile device to your computer by entering your computer's IP address or QR code. (Note: the connected IP address will be saved in history list automatically for a next use). Also remember, to setup a password for connection on your Mac / PC and protect your computers from being connected by others. So enter the same password on your mobile device to connect. Once you are connected, you can now begin to use your mobile as a mouse and keyboard for your computer.

Use Your Phone as a Keyboard

With remote mouse, you can easily use your phone as a keyboard for your PC or Mac. Once you're connected, just tap on the keyboard icon from your mobile and start typing. You can be able to see your text both on mobile screen & computer. But if you find this unpleasant, and thus do not want the text to be displayed on the mobile screen, then you can toggle the Show Input Text option via Settings.


You can remotely type with your voice by using remote mouse, and moreover, the app unveils a numeric keyboard. Apart from this, remote mouse features a key combination input & the keyboard is also functional when you switch to landscape mode.(Requires Pro to Unlock). Remote mouse brings a "return" key, & it works the same as hitting "Enter/Return" on your computer.

Use Your Phone as a Mouse

With remote mouse, you'll be able to use your phone as a Mouse for your PC. So to get this one going, just move your finger across your mobile screen to move the cursor. Tap with one finger to left-click, with two fingers to right-click, and also pinch to zoom in. If you find this tiring, you can get all the buttons which you see on the real mouse on your mobile screen. To achieve this, you'll need to enable the "Mouse" option in Panels section which can be accessed through the app menu. Remote mouse features a fully simulated mouse, magic trackpad and multi-touch gestures.


Open Your PC Apps with Your Phone

Remote mouse can come of great essence when you want to access all the apps on your PC with your phone. Simply click on the respective window icon from remote mouse which is installed on your mobile, then remote mouse will unveil or list out the apps on your computer's dock. Now tap on the app you want to access, and it will open instantly on your PC. You can open apps like notepad, power point and microsoft word etc. However i haven't figured out a way to close the apps once they're open. So you will need to stick to doing this manually from your PC or Mac for now.


Use Your Phone to Power OFF & Restart Your Computer

You can also use remote mouse to power off and restart your computer, as well as put it to sleep and log out of your profile. Notice the play icon integrated into the remote mouse app, this will allow you to control music in iTunes, Keynote, Hulu, and Windows Media Player. You can also adjust your PC's volume or change slides by using your device's volume buttons. If you want to use "Spotify Remote" & the "Media Control" you'll need to unlock it, but at a little cost.


Remote mouse also brings an air "mouse mode" feature, who'll will allow you to shake your mobile to move the cursor. If you want to tinker with more options in the remote mouse app, then head over to the Panel and Settings section. From this area, you enable left hand mouse, & also change trackpad background etc..

Final Words

Guess we are already through here. With remote mouse, you can become lazy and that's deserving. The app can help you to control your PC or Mac directly with your mobile. Remote mouse features a unique and customizable interface, app launcher and switcher. Overall, you will be able to use the app to play music, open apps and perform other tasks. All you need to do is simply to sit back and use your Android, iPhone, iPad and also Windows Phone to remotely control your PC. In summary, Remote Mouse is a handy tool which can turn your mobile phone or tablet into a wireless user-friendly remote control for your computer.
Android has improved severally since the past recent years, with customizations or mods taking over the ground with a rapid speed. If you had used an Android phone back in 2013, then you will agree with me that Android's main UI is looking pretty much good from what we actually knew back then. Developers are there creating lot's of themes and instigating users to try them out. Most of these themes can totally revamp the look and feel of your Android device to look stunning, just like what we saw in the Substranum Theme Engine. Now out of inspiration, thunder 07 decided to create an "Xposed Module" which adds beautiful background images to your Android's pull-down menu or status bar header.
Also Read: How To Theme Android Status Bar and Navigation Bar.
Thunder07 was inspired to create "Zeus Contextual Expanded Status Bar Header" after he saw "Contextual Lenox Header" which has the same similarity with the module he created. Now after using this feature on his carbon ROM, he felt he'd be able to bring back the "Contextual Lenox Header" to any stock Android running on Lollipop and above. Luckily, he was able to achieve this, even better. This feature (Contextual Lenox Header) was first seen on eXistenZ ROM and on CM based ROMs like OMNI, Resurrection, AOSP etc. So, if you're eager to customize your Android's expanded status bar header with beautiful background or images, then here's how to do it.

Prerequisites

  • Android 5.0 Lollipop and above.
  • Root Permissions.
  • Xposed Installer.

Install Zeus Contextual Expanded Status Bar Header

To begin with, you'll first need to install the Xposed Installer app, then from your app drawer, locate and open the Xposed framework. From here, simply head over to the download section via the app and search for "Zeus Contextual Expanded Status Header". Next, click on the result, then swipe from the left to jump into the version tab. From here, hit the download button and install the module afterwards. Alternatively, you can install "Zeus Contextual Expanded Status Header" from the Xposed Repository website.


Activate Zeus Contextual Expanded Status Bar Header

Next, you'll need to activate the module. Thus a notification from Xposed will pop up, informing you that Zeus Contextual Expanded Status Bar Header hasn't been activated yet, so tap activate and reboot your device. Alternatively, you can open the Xposed Installer app, from the main menu, head over to the Module section and tick the Zeus Contextual Expanded Status Bar Header box. Now go back and navigate into the framework section and perform a soft reboot.


Enjoy New Contextual Background

Now once your device finishes rebooting, then we're set to ride. Simply pull-down or expand your notification tray, you will see an overlay of gorgeous images on to of your Android device notification panel header. Automatically, backgrounds will change based on time of day, so you will always be greeted by a new & refreshing pictures when you check your status bar header. Zeus contextual Expanded Status Bar Header brings different photos each of them represents morning, afternoon evening and night. Thus, below are the time when your status bar header images should change...
  • Morning: 3.00 am until 12.00 pm.
  • Afternoon: 12.00 pm until 6.00 p.m.
  • Evening: 6.00 pm until 9.00 pm.
  • Night: 9.00 pm until 3.00 am.

Set Custom Background

After so many requests from the "Zeus Cntextual Expanded Status Bar Header", users, thunder07 has decided to update the module, and this time, he integrated the ability to set your own background in the status bar header . Thus you can now choose any of your favorite images, and use them as your contextual background. For example, you can set an Easter image to beautify your device during the event. This feature obviously comes in handy, since by default, the module brings only 3 custom background.


In summary, I'd say that Zeus Contextua Expanded Status Bar Header is probably one of the best Xposed module that can customize our Android device to the brim and while the app seems to be awesome, Thunder07 will also be integrating more features to improve the module. Soon it will be able to support all dirty unicorns custom ROMs, you can change time, hue and opacity. This module is working on LG G3, LG v10, LG G4 and other devices running on lollipop, marshmallow and above. Overall it brings a ray of sunshine to my Android device notification tray.

As a voracious reader, i have always got a lot of PDFs to deal with. Both the one's i receive from clients on my E-mail and that which i download myself. Most PDF files, brings images which are obviously meant for illustrations. Now speaking of which, a friend of mine recently sent me a PDF attachment on my Gmail, and on the course of opening the file, i found it to contain a ton of high quality pictures that can be used for other projects.... As usual, Laying waste to these images are obviously not an alternative, and so the best option is to extract the image from the PDF file.
Also Read: How To Convert PDF to Excel.
Easier said than done huh.? The process of extracting images from PDF can be as simple as ABC if only you're able to find the right tools. Usually, the most widely used softwares for carrying out this task are the Adobe Acrobat Pro DC and Adobe Photoshop​. But this can only be helpful if you've a PC. PDF can also be converted to images which portraits an infographic and the image can later be cropped to your preference without blurring or distorting it. With that said already, we're going to unveil 3 different ways to extract images from PDF files by using your PC, iPhone, Android, Windows, iPad and other OS.

Adobe Acrobat Pro DC

Adobe Acrobat Pro DC is one of the tools or software that'll makes your job easier every day with it's inbuilt & trusted PDF converter. Now if you've Adobe Acrobat Pro installed on your PC, then grabbing an image from a PDF file is as simple as ever. Acrobat Pro can manage and even manipulate PDFs, but the software is perhaps too expensive. At ($14,99) per month, Acrobat Pro isn’t meant for the occasional user. However you can choose to download​ the free trial of Acrobat Pro (fully functional version) which can be used for a limited number of days. Here's how to extract images from PDF by using Acrobat Pro
  • Open the PDF file in Adobe Acrobat Pro DC.
  • Now Check the Export all images box.
  • Select Export and a location to save the file.
  • Acrobat Pro will then extract all the image from the PDF and save them in your chosen format.

Adobe Photoshop

Adobe Photoshop is perhaps one of the widely used and raster graphic editor for PC. The software can be used to edit your favorite images, add effects, change the image background and much more. Now if you have a copy of Adobe Photoshop installed on your PC, instead of Acrobat Pro. Then you can perform something i.e similar which is to extract images from a PDF file. Adobe Photoshop can painlessly execute this task in a more simpler way. As usual, there are a couple of ways from which you can use Adobe Photoshop to extract images from PDFs. Thus you can either use PAGES or IMAGES options to perform this procedure. Let's quickly get this one going, shall we?.
  • Open the PDF file in Adobe Photoshop.
  • Select PAGES or IMAGES in the Import PDF box.
  • Now if you choose PAGES, select the page you want to turn into an image.
  • Next, If you choose IMAGES, then your document for individual images will be searched and it'll be displayed.
  • Find the image you want to extract and click OK.
  • Then go to File > Save As and change the file type to JPEG, input the image name & Save.
  • For the PAGES, set the resolution to an appropriate value based on what you'll need the photo for. if it’s for print, set it at least 300. If it’s for the web, set it to 72.
  • Click OK, and select File -> Save As. Then change the file type to JPEG, and save it.

Free Online Tools

Using an online tools, is by far the most general and easiest way to extract image from PDFs. This process can be achieved no matter the platform you're in. We've a ton of web service on the internet that can single-handedly get images, text and fonts out of a PDF file. One great tool you can use is ExtractPDF. Extract PDF is an online service that allows you to get text, images and fonts out of a PDF file. There is no installation or registration process. Just upload your PDF and it'll getthings going. Online service extracts images out of PDF through the cloud, so this won’t drain any capacity from your computer.


SmallPDF is another widely used online service that can convert any PDF file to Image without blurring it. Similar to the ExtractPDF, the images converted from SmallPDF can work on all platforms. It doesn’t matter if you're a Windows, Mac, Linux, iOS and Android users. SmallPDF doesn't store your files on there servers, so once you upload a PDF and JPG files, it will be deleted from their servers within an hour after the conversion. No one will have access to your files and your privacy is guaranteed. Here's how to get images out of a PDF file using SmallPDF.
  • Navigate to SmallPDF.com and you'll see a ton of PDF options.
  • Neglect all of them and Select the "PDF to JPG" option
  • From here, upload the PDF file to the website.
  • Select either Extract Single Image or Convert Entire Pages.
  • Wait for the conversion process to finish, and download the extracted images from the PDF.
  • The images will be compressed into a zip file, so you will need a file extractor such as Zarchiver to access the files.

Final Words

Extracting an image out of PDF file can be easy once you use one of the above guides. I'm actually a fan of SmallPDF, since they make PDFs easy. Obviously, I'd say they're one of a kind. Once you drag and drop your PDF into the box provided, then your PDF file will be converted into JPG format with good quality. So you can now extract PDFs that contains high quality images using your Android device, iPhone, Windows, iPad, Linux etc.
Infinix mobile has started rolling out the latest Android 7.0 Nougat update on the infinix Note 3 and Note 3 Pro respectively.

Image Credit: Twitter

Both device (infinix note 3 and note 3 pro) are mid-range phablets that comes with a large 6 inch display with 1080 × 1920p resolution respectively. The infinix Note 3 and Note 3 Pro features a MediaTek Helio X10 processor that’s coupled with 2GB and 3GB of RAM followed by 16GB of internal storage. With a metal design, the Note 3 and Note 3 Pro also brings 13MP camera at the back, and 5MP camera at the front with a nice flash. Both device unveils a fingerprint sensor which is present at the back. They're also backed up by 4500mAh battery.

Infinix has its own custom user interface which is based on Android 6.0 Marshmallow, and it’s called XOS Chameleon. The good news however is that the Android 7.0 Nougat update for the infinix Note 3 and Note 3 pro also brought the "XOS Chameleon" user interface. A lots of improvements and even modifications has been made during the update. Now if you want to check if the latest Nougat update for infinix note 3 and note 3 pro is available for your device, go to your device's Setting ->About Phone -> Software updates. From here, search and download the update (if found). But if likely the update has not been rolled out on your device, then follow the procedures as described below to learn how to manually download and flash the latest Android 7.0 Nougat update exclusively on your infinix Note 3 and Note 3 Pro.

Prerequisites

  • Ensure that your phone's build number is (H536 A1) for the Note 3 and (H537 A1) for the Note 3 Pro. Thus to get this info, navigate to Settings -> About Phone -> Build number. 
  • Ensure that your infinix Note 3 and Note 3 Pro is not ROOTED. But if perhaps you're rooted, then simply unroot it with SuperSU or other methods.
  • Ensure that you take a complete backup of your important data/images/files before installing this new update, this'll help you to restore them if something goes wrong during the flashing process.
  • Ensure that your device's battery is fully charge up to 70%, to avoid any form of disconnection or unusual shutdown of your device during the flashing process.
Note: Tech Viola won't be held responsible if you brick your device during the flashing process, simply follow the instructions correctly and you'll end up achieving a very pleasant and successful result.

Download Firmware

To begin with, we've two firmware formats of the Android 7.0 Nougat update for your Note 3 and Note 3 Pro device. First is actually the Tcard / SDcard or OTA format update, and the second one is the SP Flash tool format update. So you will need to choose the one most suitable for you. Thus use the below download links to grab the respective files or firmwares.

TCard / SDcard/ OTA update.zip

  • Infinix Note 3 (X601) -> Download here.
  • Infinix Note Pro (X601) -> Download here.

SP Flash Tool Update.zip

  • Infinix Note 3 (X601) -> Download here.
  • Infinix Note 3 Pro (X601) -> Download here.

TCard / SDcard / OTA update.zip Installation Guide

First, you'll need to download the "TCard" OTA update.zip file for your infinix Note 3 or Note 3 Pro from the link/URL given above. Also, endeavor to insert your TCard or SDcard into your phone and transfer the .zip file you downloaded earlier with your PC to the root of your SD card. (I.e don't place the zip file inside any folder).


Next, you will need to reboot your device into recovery mode. Thus simply switch off your phone, and then power it on by pressing and holding the Volume down + Power button. This will take you directly to the recovery mode. Now press the Volume Up key to enter the menu.


From here, you'll only navigate around options using the Volume up and Volume down buttons. So use the Volume down button to scroll down and select "Apply Update From SDcard". Now you have to locate the TCard/SDcard update.zip file from the root of your SD card (depending on where you placed it earlier). Once found, simply select it with the Volume Up key.


Now the TCard update.zip installation process will start automatically. So grab a cup of coffee &  wait until the flashing process is completed. Once done, the zip will be installed.
Now after the installation process, press power button to reboot your phone and you are done. The first boot will probably take about 4minutes to complete, simply wait until your phone reboots and then setup your device. That's it!!


You'll now see a completely revamped & new infinix Note 3 or Note 3 Pro running on the latest Android 7.0 Nougat. To see or check your phone's software version, then navigate to Settings-> About Phone -> Android Version.


SP Flash Tool update.zip Installation Guide

  • We're going to be brief here, so I'll solely recommend this procedure for those who know how to flash custom ROM or stock ROM using the SP Flash Tool software. To begin with, you'll need to Install VCOM drivers on your PC. Browse for this in the internet or in Google, then download.
  • Also find the guide to install the VCOM drivers on your PC. Next, download the SP Flash Tool.exe software and also the update.zip file SP Flash Tool format for your Infinix Note 3 (X601) or Note 3 Pro on your PC from the link given above.
  • Now, switch off your phone and load the scatter file that's in the firmware folder. Next connect your smartphone to the PC by using USB cable. Then you've to click on the upgrade button in the SP Flash Tool, the upgrading process will begin, & after that, a green ring will appear at the end of successful Upgrade.
  • Now once the flashing process is done, simply disconnect your device from the PC and then reboot it. The first boot will take time, so wait. When you're back on, then finish the setup and confirm that it has been successfully upgraded by going to Settings > About > Android version.

Final Words

That's it, your infinix Note 3 and Note 3 Pro will now be running on the latest Android 7.0 Nougat. You can now root it again after upgrading to the latest version. For now, only the Infinix Note 3 and Note 3 Pro models are receiving the updates, so you'll have to wait patiently for it to arrive on your own infinix device. Also Note that the update is rolling out for beta testers, so if you're in, navigate to the infinix mobile website to join the beta testing program.
Copyright © 2013 Smartphone And Best Game Online